GARAGE
The Garage Page
MOTORCYCLES
Buying a
used BMW
Selling a used BMW
New Owner FAQ
Rants
& Raves
The BMW K75
My
K75RT
My K11RS
My
K75S
Insurance FAQ
Motorcycle
Links
SITE
HOME
GARAGE
STUDY
ENTRY
REC ROOM
OFFICE
HEAD
KITCHEN
PATIO
Motorcycle Tech
Installing
WP Fork Springs on a 1995 K1100RS
by
Ted Verrill,
with notes by Karl Rosenbaum
As always,
this is my experience and yours may differ.
Please use common sense and if
you feel this is beyond your capabilities please bring it to a shop.
I. INTRO
Installing fork springs
on my 1995 K1100RS was much easier than I thought it would be. This was partially
due to the fact that the WP springs require no spacer (they are full-length and
progressively wound on both ends) and per the instructions that came with them,
they simply drop in. It may seem quite intricate, but as long as you have time
and patience (and 2 helpers) you will be fine. The only difficult parts are removing
and replacing the dogs (this took several tries both removing and especially replacing)
and should you have a 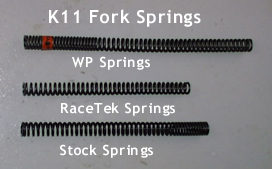 non-full
length brand of replacement springs, measuring and cutting the spacers.
non-full
length brand of replacement springs, measuring and cutting the spacers.
There are basically two choices for replacement springs, full-length springs and shorter than full-length that require a custom spacer to be cut (the K11 comes stock with shorter than full-length springs and a spacer.) As you can see from this photo, the WP Springs are the longest and progressively wound at both ends, the stock springs are shorter and progressively wound on one end, and the Race Tech springs are shortest (though much beefier than stock.) The WP Springs are as rare as hen's teeth (you can order directly from WP, call Brian at 714-692-3404, ext. 224), but several other brands are readily available available such as Race-Tech and Progressive.
Because we installed two sets of Fork Springs, this write up will vary a bit. It was written with the WP Springs in mind, and Karl added notes where necessary to take into account the installation variations from the WP's.
Karl Notes: Race Tech Part #: FRSP S293890 (important – the LT uses the same springs as the RS, but the springs are only labeled for the RS – THEY WILL FIT the LT – make sure that the dealer that you are ordering from understands). The Race Tech Springs come with the following enclosed in the box: Two springs (shown above), 2 aluminum spacers that must be cut to the correct length, 6 washers (4 of which will actually be used), and some very generic instructions.
II. PREP
Parts:
- WP
Fork Spring Kit, #: 93759 9932.192.A (1202B)
Race Tech Part #: FRSP S293890 - 1 Quart of BMW Fork Oil
- 1 Set of Rubber Drain Plug O-rings
Tools
- Two (Patient) Friends handy with tools
- Complete BMW K-Bike Tool Roll
- 30mm Socket
- Dental Pick or Awl (not required but makes it go much easier)
- M4 size Machine Screw
- 6' strong dacron-type string
- 2 Philips Head Screwdrivers
- 1 Medium Flathead Screwdriver
- 1 Magnetic Pickup (not required but makes it go much easier)
III. OVERVIEW
 The
fork spring arrangement on a K11 is pretty simple. There are basically a few parts
that matter in this procedure: the fork tube cap ("cap"), the spring
retainer cap ("retainer"), the two split collets ("dogs"),
the spring itself, the spring sleeve, the spring retainer circlip ("circlip"),
and the spring spacer.
The
fork spring arrangement on a K11 is pretty simple. There are basically a few parts
that matter in this procedure: the fork tube cap ("cap"), the spring
retainer cap ("retainer"), the two split collets ("dogs"),
the spring itself, the spring sleeve, the spring retainer circlip ("circlip"),
and the spring spacer.
The rod arrangement slightly compresses the spring by connecting to a retainer at the bottom, and the cap on top with the spring sandwiched in the middle. When the cap is removed, there will often be an inch or two of "spring" so be careful when removing it. The dogs fit into a "slot" in the rod and against a recess in the retainer cap (so that when the dogs are removed the retainer cap will freely slide off the rod under the spring pressure.
IV. PROCEDURE
DISASSEMBLY
 1.
Remove cap
1.
Remove cap
(Bike should be on the centerstand, towel over tank
to prevent damage.)
You will need
the 30mm socket for this. Go slow and put plenty of pressure on the socket to
keep it from popping off of the cap and damaging the corners. It also helps to
have a friend steadying the handlebar and one steadying the bike (this cap can
be on quite tight!
 2.
Drain fork oil
2.
Drain fork oil
Make sure to have a piece of cardboard or tin foil handy or the oil will drain all over your wheel and tire. Make sure to replace the rubber drain plug o-rings, and for heaven's sake remember to put the drain plugs back in :))
Karl Notes: If you do not remove the cap first you will not get all of the fluid out of the forks
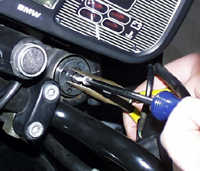 3.
Insert machine screw
3.
Insert machine screw
Using a
pair of pliers (needlenose work best), get a good grip on the rod to keep it from
spinning. Insert and screw the machine screw into the hollow recess at the top
of the rod - really there is no proper size, just large enough to get a good purchase
on the rod without marring it up too much or going too deep. The screw should
be snug, but not too tight.
 4.
Tie Screw with dacron string
4.
Tie Screw with dacron string
Tie
a good slip knot around the screw and make sure that the knot is secure and that
the screw will not pop out with tugs from different directions. You will want
to make sure that the knot does not extend beyond the head of the screw or you
will have trouble slipping the retainer cap past the knot/head of the screw.
 5.
Push down on retainer cap with 2 philips screwdrivers to allow the dogs to be
removed
5.
Push down on retainer cap with 2 philips screwdrivers to allow the dogs to be
removed
Take the bike off the centerstand and be sure to have
someone holding it from the rear. Keep the sidestand down so if the bike-holder
loses balance he can sway the bike to the left and keep it from going over.
There
are four holes in the retainer cap. Insert the tips of two large, long-handled
philips screwdrivers into two opposing holes and, standing on the pegs, push down.
Simultaneously your two helpers must be busy, the first steadying the bike and
the second pulling on the string. The aim is to push the retaining cap down on
the rod so that the pressure on the dogs from the cap recess is removed and the
dogs can be removed from the slot on the rod.
 6.
Remove dogs with pickup magnet or loosen with dental tool/awl then remove by hand
6.
Remove dogs with pickup magnet or loosen with dental tool/awl then remove by hand
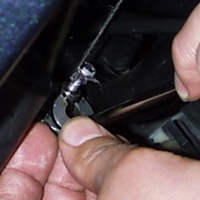
When the retainer cap is pushed down on the rod, the pressure from the retainer cap on the dogs will be released and they can be removed from the slot in the rod. If the stringholder is careful, once the retainer cap is pushed down enough he can place the string in his mouth and at the same time use either a magnetic picker-upper to pick out the dogs, or carefully try to pick them out with his fingers. Really, a third helper helps here.
From the photo
you can see how the two half moon dogs rest in the circular impression of the
retainer cap (see the picture in the overview for what the complete assembly looks
like.)
7. Slowly
release pressure on the retainer cap being careful not to pinch string
Be
Careful here as there may be pressure on the cap from the spring - go slow.
When the dogs are removed, the person who has patiently been pushing down the retainer cap with the screwdrivers can slowly begin to ease off the pressure. While he is doing this the stringholder must make sure that as retainer cap slides off the rod the head of the machine screw passes easily through the hole in the retainer cap. Some jimmying may be required. A secure screw/rod connection pays off here as it is an easy fix if the string breaks (it did several times for us) but would be a major pain if the screw were to come out of the rod. We simply fed a new slipknot down into the fork tube and over the head of the screw. After the retainer cap has been removed, put the bike back on the centerstand.
8. Pull out circlip
On my right fork this circlip was already loose in the fork tube, the left tube's circlip took about 30 seconds with a flathead screwdriver to pop it out.
9. Remove spacer, sleeve & spring
The spring assembly should be removed, including the spacer, the sleeve and the spring itself. They will slide right out, though you may have to use something like the curved tip of a dental tool to get down into the tube and hook them. In a pinch a coat hanger with hook bent in will work fine.
NOTE: If you have springs that require a spacer, you will need to carefully follow the directions that came with the springs to measure and then cut the new spacer sizes. You will then need to follow the directions on the order of reassembly.
REASSEMBLY
9.5
Race Tech Addendum:
Section 9.5
applies to Race-Tech springs ONLY
Preliminary:
If you read the
instructions, you will notice that the K11 uses the Type 2 damping rod. Also there
is an illustration of the different Fork Cap Types. The K11 uses the Type D (the
measurements will be made from the circlip that holds the top of the spring)
Determining the Length of the Preload Spacer Length:
Extend the fork
all the way (easiest way is to have the bike on the center stand and then have
someone pressing down on the back to raise the front wheel off the ground). Drop
the spring and then the spring washer into the fork tube. (We varied from the
instructions at this point since the tape measure that we were using was to wide
to get an accurate measurement with the rod in the way.) Insert one of the spacers
with the fork still fully extended. We marked the spacer using a scribe where
the circlip was placed prior to removal (this is measurement #1). Remove the spacer.
Now using your tape measure, measure the length to the circlip to the top of the
fork tube where the cap would be (this is measurement #2). Subtract measurement
#2 from measurement #1. This is the length that the spacer would be cut for if
you want zero preload. Add ¼" to 1 ½" (this is on the Race Tech directions
under heavy bikes or preload extremes) to this distance according to how stiff
you want the ride to be. I opted for a firmer ride since I do ride two up. Another
consideration for a stiffer ride would be if you ride with a lot of gear on occasion
(i.e. side cases full, tank bag installed, top case fully loaded, etc). I used
an addition 1 ¼" preload. Now that you have the preload length determined,
cut the spacers that are included in the kit. In my case, Brian Horias took them
home and used the ban saw and then filed the cut edge a little to ensure that
there were no sharp edges. I would recommend that if you use a hacksaw or a ban
saw, that you file the edges to smooth them out a little.
 10.
Add the fork oil, then feed string through new spring, sleeve, and retainer cap.
10.
Add the fork oil, then feed string through new spring, sleeve, and retainer cap.
If your springs require a spacer and washer, remember to include
them in the proper order.
Add the new fork oil - at this stage you can simply pour it in (later you will need a syringe or a small funnel and lots of time :) One of the forks takes 400cc's and the other takes 350cc's (you'll need to check the manual that came with the bike for which side takes which...)
We tied a washer at the end of the string to help ease the it through the spring. Make sure that you start feeding the string through the bottom of the spring so that the spring ends up correctly positioned in the fork tube. For the WP springs, the spring goes first, then the sleeve, then the retainer cap. Make sure to be careful when passing the retainer cap over the head of the machine screw and onto the rod.
Karl Notes: For Race-Tech springs, insert spring, 1 washer, cut spacer, the last washer (remember there are 6 washers – you will use 4 of them) and then the spring cover that was removed in step #9.
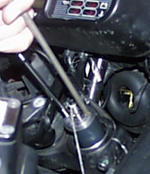 11.
Using same two philips heads, push down on cap (while keeping it centered) and
pull on string so that rod feeds through retainer cap hole.
11.
Using same two philips heads, push down on cap (while keeping it centered) and
pull on string so that rod feeds through retainer cap hole.
Take the bike off of the centerstand and like before have a helper holding onto the back to keep it centered. As you can see from the photo, there will probably be one eighth of an inch to an inch of spring coming over the rod-end. You will need to force the retainer cap with the two screwdrivers over the machine screw and rod end so that the slot in the rod that accepts the dogs is fully visible. It may take some jockeying around and a third set of hands centering the retainer cap over the spring assembly. When you get to that point, hold it :)
Karl Notes: The Race Tech springs are a lot stiffer than the WP’s be prepared to push down pretty hard at this point to get the rod up far enough for the next step.
 12.
Seat dogs in slot on rod
12.
Seat dogs in slot on rod
NOTE: It may be prudent to wear eye
protection when reinserting the dogs as they have been known to pop out when the
spring pressure is applied if they are not seated properly.
This sounds much easier than it is. As a matter of fact, if you go slowly and accept that it will take a few tries to fit them in you may very well get them in on the first or second try. Be very careful here as the dogs have a very bad habit of popping out and falling down into the fairing when slightly misaligned - have the magnetic pickup tool ready at hand and don't get frustrated.
This
will take a lot of patience from the screwdriver-pusher as the biggest problem
we had (aside from the string breaking once or twice :) was the pusher inadvertently
moving the retainer cap around while trying to keep pressure on it to keep the
dog slots in the rod visible and accessible. Once you've put them in on one side
the other will go much quicker as you will know precisely what is needed to get
them in and seated (patience & dexterity ;-)
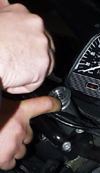
 13.
Slowly release tension - eyeball to ensure proper fit.
13.
Slowly release tension - eyeball to ensure proper fit.
Once
the dogs are seated, simply slowly release pressure on the retainer cap and the
dogs will fully seat, holding the cap and compressing the spring. Remove the machine
screw and string, and it should look like the pic to the right.
14. Replace Cap
Replace the cap, tighten (but not too tight!) then either do the other fork or if you are done take the bike for a *very careful* test ride to make sure everything is seated correctly and that you didn't forget anything (you made sure you didn't have (m)any parts left over, right?)
CONCLUSION
I love the WP springs - I noticed the change gradually as I hit road varying surfaces where the bike before performed one way and now performed differently. On the whole, the difference is most noticeable over rough or rippled pavement where it is much smoother and seems to float over the imperfections, and in cornering where the front end stays completely planted with none of the previous "twichiness." I would highly recommend these springs.
Karl Notes: I have been riding with the new springs for about a week and noticed that the bike rides much better. The turns are easier, the bumps do not jar me like they used to, and the front end does not dive as much when you hit the brakes. I choose to use the BMW 7.5 fork oil for this time of the year, but believe that I will change it to some 10W oil in the warmer months. I think that the front end could be a just a little firmer
NOTE: Thanks to Bill Shaw, Karl Rosenbaum and Brian Horais - Bill was the man with the screwdrivers and a warm garage, Brian had the spring swap experience and a band saw for Karl's spacers, and Karl was the man for the fork oil and, yes, the digital camera!
